Sunday 12 December 2010

More Christmas decorations

A lovely Christmas dinner with fellow miniaturists ended with the exchange of gifts.

From the bran tub, I received some lovely baubles, which now adorn the front of the shop, along with a box of decorations and a set of three Santa tins.

I'm going to fill one of the tins with biscuits, or sweets, and paper, leaving it slightly open give the impression that the other tins are also full of goodies.


Monday 15 November 2010

Christmas comes early

At the dolls' house session this week we made a poinsettia plant, which is very cute, and was very fiddly to make.

I've dressed the living room with the tree, some presents, swags and a stocking.

The tree, which lights up, was a bargain at £2. The presents are made from packaging foam that I save, covered in mini wrapping paper that I print from the internet. The swags are two sparkly pipe cleaners, costing pennies, with some red ribbon bows and plastic berries in the middle that I spotted at Durham market.

Finally the stocking is felt (stiff felt, not craft felt) with florist wire and cotton wool. Oh, and some left over leaves from the poinsettia.


Saturday 25 September 2010

Seasonal decorations

I'm starting to think about seasonal items for the house, most of which I'll make myself. I'm on the lookout for the little foil bits from sweets, which will make perfect mini Christmas crackers.

I'm going to buy a tree with lights for display in the lounge, and make some 'candles' and decorations for the shop.

A pack of felt arrived the other day, so I made a little Christmas stocking. You can buy them of course but the ones I've seen look iffy in terms of quality. This one is hand sewn, not glued. I plan to pop some 'presents' in before I display it at Christmas.

Before all that of course is Hallowe'en, so pumpkins are next on my list!


Shop: sandwiches

I've created another batch of sandwiches, this time at a reduced size. You can see that the ones on the tray to the left display tray much better than the original ones. Of course, reducing the size makes them even more fiddly to make!


Sunday 5 September 2010

Shop: window cheese display


I find Fimo so hard to bake. I prepared some mini cheese rounds, crackers and apples and popped them into the over on 150 degrees. Within 10 minutes some of the cheese had started to burn, but the smallest items - the crackers, were doing fine.


Never mind, I still use the burned items, just with the overcooked side away from view.

The cheese window is almost complete. Both displays need prices and perhaps some point of sale signage to tempt potential shoppers to call in!


Saturday 4 September 2010

Shop: window dressing

A quick search for 'Victorian shop fronts' on Google resulted in a range of images showing panelled wood behind the items on display.

Some spare balsa came in handy, so I cut it to size, actually half an inch longer, and I stained it in walnut once I'd added strips of wood to give an impression of panelling.

I made a shelf from some spare cornicing, reversed, and steadied in placed with a big blob of blu-tak.

The other window will feature three biscuit tin boxes and some cheese, which I'll make in the next few days.


Shop: new items, and sandwiches

I found a website called My Tiny World which has a good selection of shop packages and stock amongst other mini items.

My order was efficiently managed and arrived very quickly. Three of the packages had been crushed in transit, but My Tiny World immediately offered to send out replacements once I'd contacted them. That's great service so I'll be ordering again from them.

I love the little biscuit tins, which are made of tin. The tins of cocoa and conserves are excellent quality in terms the print clarity and materials. The Le Soleil Malines conserves tins even open, so you can fill them for added real life effect should they be used in a kitchen.

The very cute Twinings tea boxes come in a set of six, so I bought two.


Finally, I made more sandwiches for the shop.

Saturday 28 August 2010

At last - we're moving house!

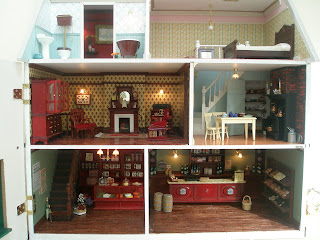
This week we carefully moved the house from my project area in the kitchen to its permanent home in a corner of our back lounge.

After I placed all my items in the house I realised that I need a lot more. I don't think it will ever be fully finished. The lovely thing about it is that I can always add to it.


Lounge: books

I've made more books for the shelves in the dresser. Some of the books are individual and some are rows.

The book covers are printed from Jim's Dollhouse Pages website. After I've cut them to size, I stick them to some trimmed balsa wood. This is fine for bookshelves as you can't see the inside of the 'book'.


Wednesday 25 August 2010

Bedroom: decorating just about complete

The bedroom is just about ready. I've added skirting board, picture rail and cornicing, all mitre cut. All that's outstanding is to make a door frame and a door, and touch up the ceiling where I have missed bits.

The carpet is a sticky back fabric sheet which I bought at Dolly Foster dolls houses shop in Sunderland earlier this week. I used the same method of fitting paper to the floor and using this as a template.

While I was at the shop I decided to buy a bed rather than make one. This one is in wood and is seems good value for £6.75.

This room needs lots of fabric accessories, including bedding and clothing, and dressing table items, pictures and mirrors.


Sunday 22 August 2010

Bedroom: Wallpaper on!

I've pasted up the wallpaper this morning. Most doll house hobbyists recommend using a specific paste for wallpapering, but I find that carefully applied PVA works for me. Next are the cornicing, picture rail and skirting boards.

I'm starting to think about furniture too. I have a press and dressing table which need a bit of modification to fit in properly. I've decided to have a go at making my own bed, using some spindles I bought in York, with bass wood. An old pinstriped shirt will provide the perfect fabric for pillows and a bedspread and I've foam and filling to make a mattress, but more of that later!

Saturday 21 August 2010

Bedroom: paint and wallpaper

To avoid the horror that is X-Factor tonight I started to decorate the bedroom. I picked up the paper at a Dolls House shop in Chester le Street and the pink paint is a sample from B&Q.

The paper will cover 3/4 of the wall, with pale pink paint above a picture rail.

The pink paint is a bit messy but that won't be visible as paper, picture rail and cornice will cover that. The paper is now cut to size and is being flattened for easier adhesion tomorrow.

I'll be painting the wood in a light cream, it is much more realistic than white.


Sunday 11 July 2010

Lounge: some furniture added

More furniture is needed of course but that will come in time as I collect pieces.


Bathroom: floor

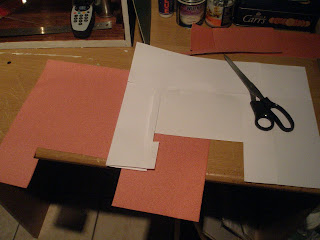
It is less risky to fit paper to the bathroom floor then use that as a template for your flooring, as I've done here:


Saturday 10 July 2010

Bathroom: false passageway and decoration

This house has a big bathroom. Correction: this house had a big bathroom. A trial run with the furniture showed a great waste of space, and frankly I was having difficulty wondering what to do with it.

I've resolved this by building a false wall, giving the impression that you would walk out of the bedroom, though a passageway, to the bathroom. It's not perfect but it works.

I made a frame first to support the false wall, and painted the passageway, adding wood fixtures and a light.

In the bathroom, I've used the same tile paper as for the inside of the kitchen cupboard, stuck on with PVA. The panelled wood is etched balsa, and the picture rail nicely tops this off. I've added skirting board and a little cornicing. White paint is too stark, a light cream works much better.

Flooring, lighting and furniture is needed now. I'll also add some items in the passageway.


Living room: woodwork

I've mitre cut the picture rail, cornice and skirting board, stained it in mahogany and fitted it. Working around the fireplace was very fiddly.

This room is ready now for filling with furniture, rugs and ornaments.


Sunday 13 June 2010

Living room: floor

The living room floor is now complete.I've used PVA to glue the sticks to the floor. Remember that the floor has already had a coat of 50/50 water/PVA applied. The banisters are also in place, and there is an area at the top of the stairs where the paint and wallpaper don't meet, so I've cut and stained some wood pieces to fit there once they've dried.
I've made a door frame, which you can see from the kitchen. I'll also add this to the living room once I've tidied up the wallpaper and finished the picture rail.

After that, I'll mitre cut the skirting board, stain it and fix it.


Tuesday 8 June 2010

Living room: picture rail and lighting

Today I've fitted the picture rail, which is at a bit of an odd level due to the height of the ceilings. Traditionally they would be at least another couple of feet higher. I've also fitted and connected the wall lights and the fireplace light. The lolly sticks are cut and ready for painting. Rather than mahogany or walnut, I'm giving them a wash with a butterscotch coloured paint.


Monday 7 June 2010

Living room: wallpaper and cornice

I've pasted fleur de lis wallpaper on the living room walls, and have fitted cornicing, which I've measured and sawed using a miniature mitre box (see the last picture for how I do this). Tomorrow I'm adding a picture rail and am cutting lollypop sticks to size before staining them in walnut for the floor. After they are fitted I can add a skirting board.

Skirting boards, cornice and picture/dado rails should always be mitred for a more realistic look. It's painstaking but worth it!