I've cut and fitted tiled paper for the kitchen larder.
Sunday, 17 January 2010
Friday, 15 January 2010
Kitchen: pantry construction
I've painted the floor grey (I'll make individual tiles to lay later) and the walls duck egg blue and have scored the wood so that it looks like planks. The stairs are glued in place and the rail needs to be attached. I've fixed the hinges on the wrong side of the door frame so I need to move them and create some architrave before fitting the wall in place permanently.


Monday, 11 January 2010
Kitchen: planning and pantry
Here is the plan for the kitchen (further details in earlier post below).

I made a paper cut-out of the shape of the space under the stairs, and used this to cut the wood to fit.

And finally, the wood taped up to check that it will fit. They will be fitted properly.

I used a diamond file to remove the heart shape in these chairs, which wasn't very Victorian! The chairs and table were a bargain at under £5 for the set but they do need a bit of work to fit in.


I made a paper cut-out of the shape of the space under the stairs, and used this to cut the wood to fit.

And finally, the wood taped up to check that it will fit. They will be fitted properly.

I used a diamond file to remove the heart shape in these chairs, which wasn't very Victorian! The chairs and table were a bargain at under £5 for the set but they do need a bit of work to fit in.

Kitchen: planning and stairs
The kitchen's depth is slightly longer than its width, with a staircase built across the back of the room.
I'm building an under-the-stairs scullery/pantry which will give a glimpse of a tiled, shelved cupboard, eventually filled with crockery and food. I'm also building a brick fireplace for the stove, using the same technique as the exterior.

Here are the stair pieces being built after painting:


Here are the stairs, not yet fitted, just in place to help with the planning:


I'm building an under-the-stairs scullery/pantry which will give a glimpse of a tiled, shelved cupboard, eventually filled with crockery and food. I'm also building a brick fireplace for the stove, using the same technique as the exterior.

Here are the stair pieces being built after painting:


Here are the stairs, not yet fitted, just in place to help with the planning:


Wednesday, 6 January 2010
Cheese counter and bakery
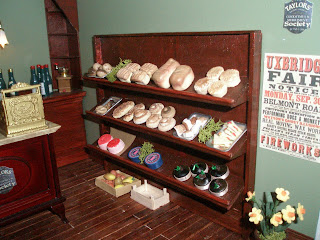
It is so easy to overbake polymer clay. However with a little glue, ribbon and brown woolly bits - and a bit of imagination - I've managed to rescue the mini cheddar rounds and transform them into chocolate cakes.
Most of the other items were rescuable with a bit of paint. The better ones sit at the front and the ones with faults at the back.
I also made some breads from air drying clay, and I used acrylic paint washes for colour. Some corks, cut and painted, have been added to bulk out the cheese counter.
I still need more shop items but enough is enough for now. I'll pick up, or make more, when I see specific items that I want to create.
This weekend I'm going to choose between the lounge and the kitchen as my next room. I plan to put a false wall under the kitchen stairs, which face the front of house, so that I can built shelves inside and create a bit of depth. It's an idea I spotted in a dolls house magazine.


Sunday, 3 January 2010
Exterior brickwork complete and frontage attached
Subscribe to:
Comments (Atom)


