

Tuesday, 8 June 2010
Living room: picture rail and lighting
Today I've fitted the picture rail, which is at a bit of an odd level due to the height of the ceilings. Traditionally they would be at least another couple of feet higher. I've also fitted and connected the wall lights and the fireplace light. The lolly sticks are cut and ready for painting. Rather than mahogany or walnut, I'm giving them a wash with a butterscotch coloured paint.

Monday, 7 June 2010
Living room: wallpaper and cornice
I've pasted fleur de lis wallpaper on the living room walls, and have fitted cornicing, which I've measured and sawed using a miniature mitre box (see the last picture for how I do this). Tomorrow I'm adding a picture rail and am cutting lollypop sticks to size before staining them in walnut for the floor. After they are fitted I can add a skirting board.
Skirting boards, cornice and picture/dado rails should always be mitred for a more realistic look. It's painstaking but worth it!


Accessories
Here are some accessories that I bought today for the kitchen and sitting room from a new shop that's opened near Vine Place in Sunderland called Dolly Foster.


Monday, 31 May 2010
Living room: chimney breast and recess
The chimney breast in the kitchen adds a touch of reality, so I decided on making one for the living room from balsa wood.
The bought fireplace had a black background where really there should be a hole for the chimney, so I've removed it using a keyhole saw and then sanded down the edges with a diamond file.
I cut a hole in the chimney breast, and painted and bricked some balsa to resemble a recess. I'm now trying to work out how to make a grate, which I can fill with some tiny painted pebbles as coal, and some suitable sized twigs cut down into 'logs'.


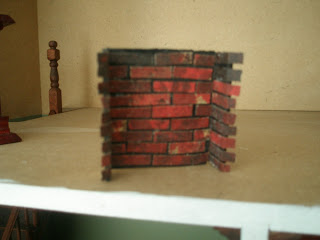


The bought fireplace had a black background where really there should be a hole for the chimney, so I've removed it using a keyhole saw and then sanded down the edges with a diamond file.
I cut a hole in the chimney breast, and painted and bricked some balsa to resemble a recess. I'm now trying to work out how to make a grate, which I can fill with some tiny painted pebbles as coal, and some suitable sized twigs cut down into 'logs'.


Sunday, 14 March 2010
Shadow box for Mother's Day
I decided to create a shadow box for Mum. I had all of the materials already, including balsa and bass wood which were used to make the fireplace.


Wednesday, 24 February 2010
Kitchen: fitting the walls!
The two walls are now fitted, using PVA and a bit of pressure. I couldn't resist dressing the room, although there is plenty of finishing work to complete. The cornicing and skirting boards are next.
The 'tiles' are an embossed card which is an easy solution, and, although it looks fine, I prefer a more bespoke approach, so will likely not use this again.


A hot stove:

The 'tiles' are an embossed card which is an easy solution, and, although it looks fine, I prefer a more bespoke approach, so will likely not use this again.

An empty kitchen:

The two walls and tiled floor in place, but not affixed:

A quick dress of the room:

Add a bit of realistic lighting:

A plentiful cupboard:

A hot stove:

Monday, 8 February 2010
Kitchen: fireplace wall
I've built the fireplace wall separately for easier application of the brick slips. I had some thick black card which has been perfect to creat a wall and chimney breast. Some of the cornicing has provided a sharp 90 degree angle for the breast. The mantlepiece is 3/16" basswood with strips of cornicing as supports. The whole unit was painted black before the brick slips were applied.
The brickslips are entirely hand made from stipple painting sandpaper with black then red paint (wait for the first colour to dry) and are 3/16" x 3/4".


The brickslips are entirely hand made from stipple painting sandpaper with black then red paint (wait for the first colour to dry) and are 3/16" x 3/4".


Subscribe to:
Posts (Atom)